I'm at it AGAIN!!! I know it's crazy, but after my first play kitchen (tutorial here) and then another smaller version for my niece (tutorial here) a year later, I still had another idea I wanted to try out. My friends little boys love to play with ours when they visit, and usually all four kids end up playing "restaurant" taking turns being the customers and the waiters so I decided it would be the perfect gift. But I wanted to make one that was not girly and more manly for these cool little dudes so I decided a "Boys Bistro" would be the perfect challenge.
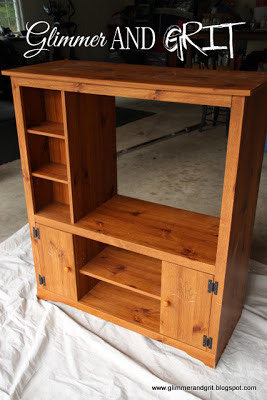
To get started I found this old entertainment center on craigslist for $5.
To move this easier when it's done and to help support the play kitchen I added four wheels to the bottom. The wheels I had weren't tall enough so I cheated and used four small pieces of scrap wood screwed to the bottom of the entertainment center to make them tall enough.
Then I took off the bottom right cabinet door and used wood filler to fill in the holes from the screws. The door is moving to the other side to become the "freezer".
The tv area is now going to be the sink and stove top so I used the metal mixing bowl I bought to trace the circle for the sink, and marked the spots for the faucet and the stove knobs (that I got off a broken stove at a local thrift store) and then used my cordless drill to drill holes for each. For the sink I used the hole I drilled just inside my circle as a starting point for my little jig saw to cut out the circle.
This is what it looks like cut out. Because this entertainment center was not solid wood, I painted it first with primer then the turquoise so the paint would stick. Under the sink I painted black for the "oven".
For the "oven" I used a tension rod and a piece of fabric to cover where the "sink" bowel drops down into the shelf area and then used the shelf as the top of the oven and a drawer front from an old end table as the oven door. A couple hinges and a magnetic closure help keep the door closed (some light chain and hooks on the corners are a good idea as well to keep the door from slamming down and breaking).
Under the little curtain is also a perfect spot to store dishes. I got these green cups, plates and bowls as well as some baskets (and a bunch of other accessories) at the dollar store.
For the "fridge" and "freezer" I mounted the other cabinet door that I took off early above it's mate on the left and painted then both with chalk board paint, perfect for the daily special at the bistro!!! Since it's their birthday I thought cake was the perfect first special!
The sink is a large metal mixing bowl and the faucet is a cheap bathroom faucet from Walmart.
The "burners" are no slip coasters from the dollar store that I glued down. I used old mason jars as containers for the utensils and some flowers that along with the salt and pepper shakers all came from the dollar store.
Since it's a "restaurant" I thought they should have menus so last minute I cut up some card stock I had on hand and added some sticker letter to the top of each to spell out menu.
Sticky 3M hooks hold the measuring cups, pot holders and towels on these inside walls.
The same hooks also are perfect on the outside for hanging these cute little khaki kids aprons that I found at JoAnn's for a few bucks.
And no play kitchen is complete without food!! So I got a good mix of play food in a cute basket and used the left over fabric for little matching napkins for the customers!
The last little basket, I put on a shelf over the freezer and filled with an eraser and colored chalk for future "daily specials".
The sign is just a scrap piece of pallet wood that I painted turquoise and then tan. For the letters I used cheap paper stencils and then distressed it all to let some of the turquoise show through and tie in all the khaki towels and curtains.
Behind the sink instead of using a sold piece of bead board like I did on my daughters, I used a long tension rod and two pieces of a drop cloth to make curtain panels and then the last of the green and blue fabric for a little valance.
I hope our little buddies like their "Bistro", it sure was a lot of fun to make.
If you have a little guy in your life, don't hesitate to make a play kitchen for him.. the boys love them just as much as the girls!!! Just call it a "Bistro" and the dads won't fuss too much :)
Enjoy,
,


No comments:
Post a Comment